DEPOSITION TRANSCRIPT SERIES / PART ONE OF THREE
Here’s how to take advantage of deposition transcript software to level up your transcript management process.
There are many important tasks and responsibilities involved in a litigation matter, but telling a story is a key goal of an effective litigation strategy. Humans, including judges and jurors, relate to stories – but it can sometimes be complicated to fit all the pieces of the puzzle into a story that successfully incorporates the necessary people, places, and events.
Reviewing emails, texts, and PDF files in ediscovery reveals a sliver of the story, but litigation teams frequently depose individuals and witnesses to get a fuller picture of the interplay of people and events. The transcripts from those depositions (as well as those from other legal proceedings) are invaluable for digging deeper into a story.
But in order to see trends, similarities, and conflicts it’s important to have a deposition transcript software for managing multiple transcripts where the team can search and analyze everything in one location. Typically, each member of the litigation team would print out their own copy of a transcript and mark it up with pens, highlighters, and sticky notes. That means all the notes and thoughts are siloed in their own minds and other members of the team can’t benefit from their insight. The whole manual approach is incongruent and haphazard at best for helping to establish a consistent and comprehensive understanding of the matter.
A Single Trusted Transcript Repository
The better alternative is to establish a single, trustworthy repository for all transcripts where the entire team can quickly locate what they need and aggregate all their highlights, designations, and notes. No one wants to waste time searching around the office (or their computer) for a copy of a transcript that should be easy to locate. Even better if that transcript repository can connect to an evidence database allowing direct links to documents referenced in the transcript.
Such a repository could take the form of software on a computer – but the better option is a cloud-based platform that’s accessible from any computer or mobile device. Not only does that mean quick access to transcripts from wherever you are, but the entire team can now share work product that isn’t siloed away in a yellow legal pad sitting on a desk.
Even if a senior attorney still insists on printing out a transcript for their own isolated use, having a single repository means that other members of the team can immediately access the transcripts when that attorney demands a report or specific section of a transcript. And that can be done in a matter of minutes instead of hours or days. This efficiency highlights the importance of reliable deposition transcript software.
Lastly, having a single, trustworthy transcript repository is an excellent method for tracking deponents and witnesses to ensure everyone has been accounted for, and whether there is anything missing or incomplete.
Selecting the Right File Format for Deposition Transcripts
Transcripts can come in a variety of different file formats, and it’s important to understand how to request the right one for your needs. Most court reporters still utilize a “steno machine” that is connected to a laptop computer. The laptop converts the shorthand from the steno machine into a simple, ASCII text file that can be read by non-stenographers and includes page and line breaks. The “raw” text file can be used universally by transcript management platforms, although they can also be converted into other formats including E-Transcripts or PDF files.
While PDFs allow for easy viewing on a computer, they’re typically not the best format for transcript management tools such as Nextpoint because the PDF file usually strips out the all-important page and line breaks. Importing the original ASCII text file will give the team the most flexibility for assigning issue designations and linking to documents. It’s a good practice to request the text version of the transcript from your court reporter if you intend to import it into a transcript management platform (although you can certainly request more than one format).
If the court reporter can pre-link exhibits to the text transcript, that can be delivered as a “LiveNote Evidence Format” (LEF) file and imported into Nextpoint. And if you have a video recording of the deposition, the video can be synchronized with the text transcript and converted to a CMS file, which will help you take advantage of the analytical tools in Nextpoint.
ANALYZING A TRANSCRIPT IN NEXTPOINT’S DEPOSITION TRANSCRIPT SOFTWARE

-
Click on “Exhibit 1” to see the document in your Nextpoint database.
-
Click on a number on the right side to jump to that timestamp in the video clip.
-
Click on the colored dots on the left to see the issue designations that have been made in the transcript.
Reporting and Searching in Your Deposition Transcript Software
Once your transcripts are imported and indexed in Nextpoint, you can immediately see the witness names and deposition dates for each transcript all in one list. You can even generate a Summary Report that provides a high-level listing of all the transcripts you’ve loaded into a case along with associated documents, dates, clips, and designations.
There are several options for quickly searching in a single transcript, or across multiple transcripts. If you need to narrow down your list of transcripts to only those that contain a specific word or phrase, you can type a search term to get that listing. You can then download a “Search Hit Report” and even save that search so that other individuals on the team can quickly re-run those searches.
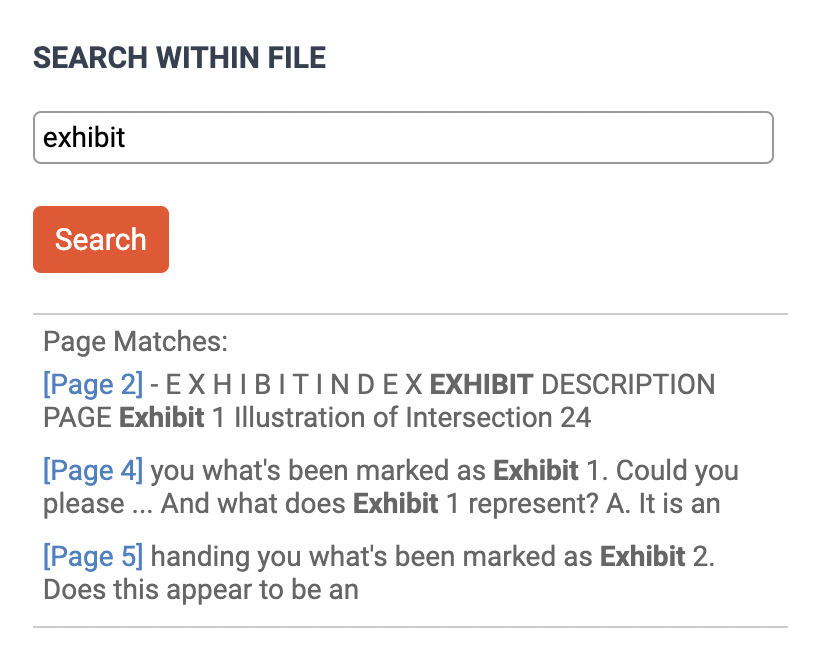
When you click into a single transcript, you can easily perform a targeted search for terms that will then be highlighted in the text. You will also see a clickable list of search results that will jump you directly to the relevant section of the transcript where the search term is located. At any point, you can select a set of lines in the transcript and assign an issue designation and add a note. In Part 2 of this series, you’ll learn how to generate a report of all the issue designations and notes that you’ve associated with the transcript.

Search for a term to see all the transcripts that include that phrase, along with other key information such as deposition date, witness type, and defending/deposing attorney.

Search for a term in a specific transcript to get a clickable list of search results.

When you click on a search result, it will jump to that line in the text, and the targeted term will be highlighted.
Getting an Overview of Your Evidence
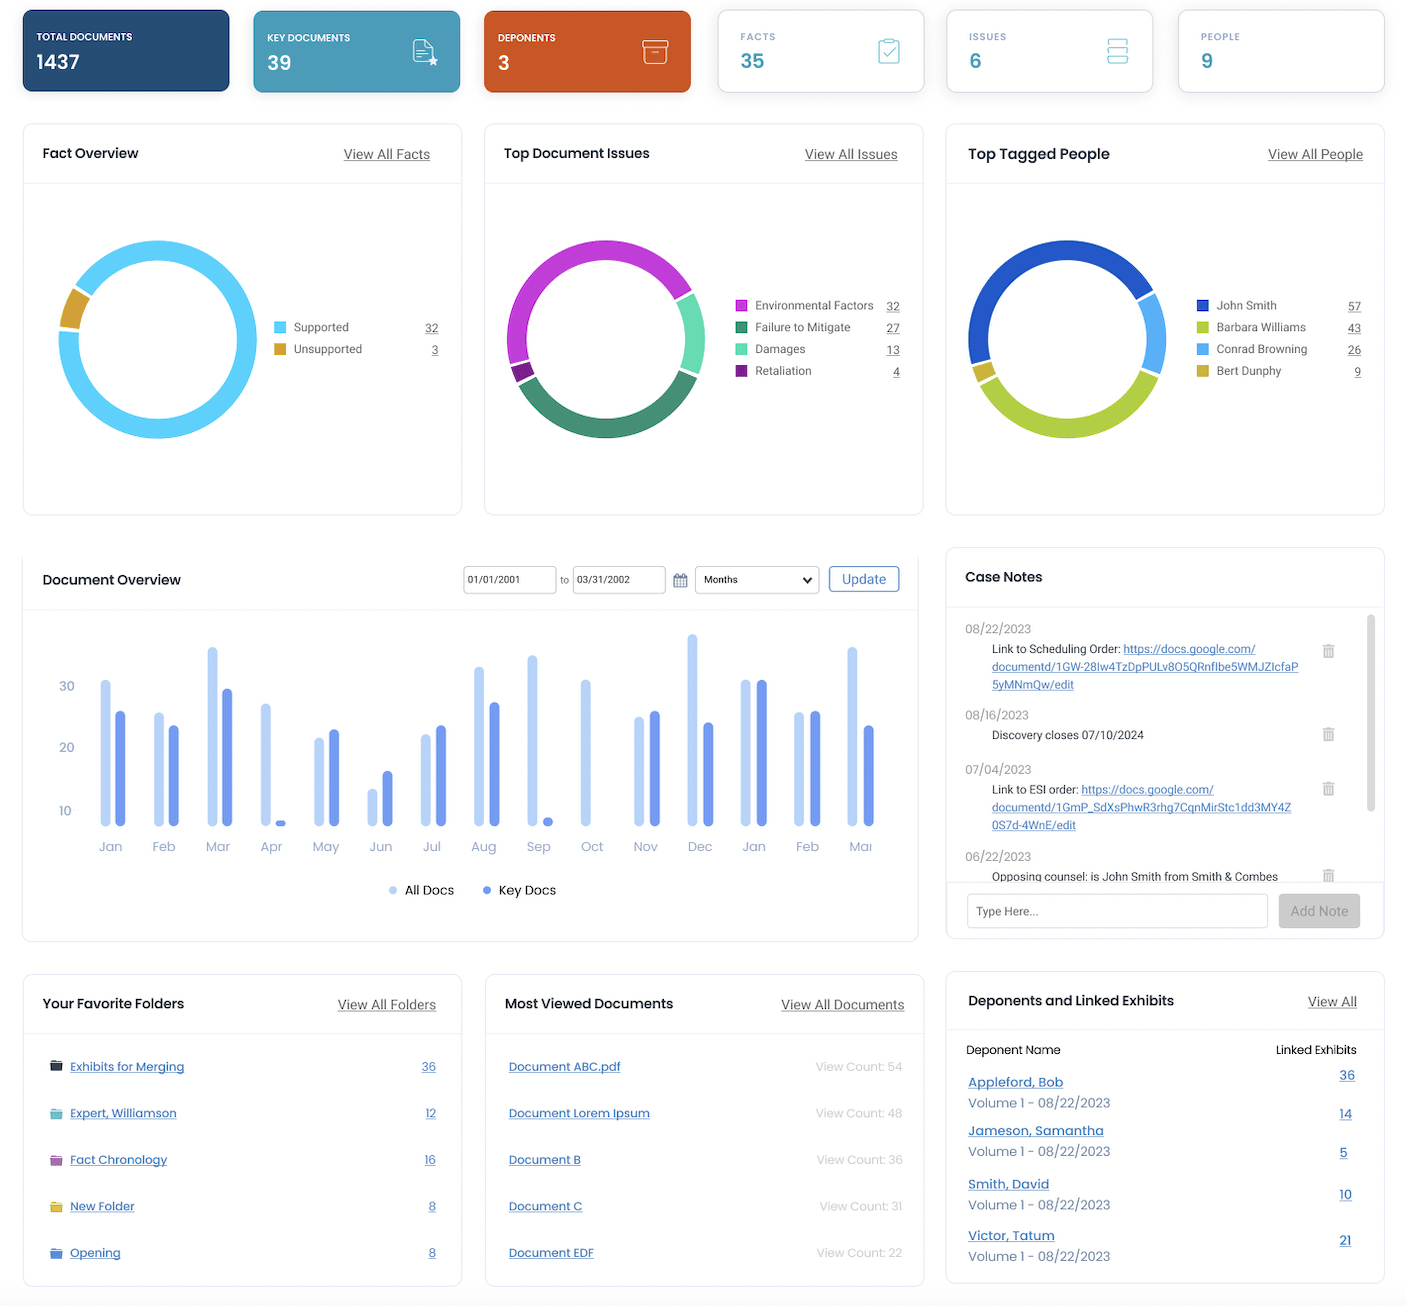
One of the best ways to get a high-level picture of your case and status on transcript review is to click into the Evidence Dashboard.
The Evidence Dashboard allows you to visualize the various case elements that you’ve identified as important points for your story. It features charts that break down the facts, issues and people in your case, as well as a field that lists your deponents and linked exhibits.
You also have quick access to a helpful section called “Case Notes,” which is a shared resource where the team can add notes about the case, including scheduling information, links to court documents, and other materials that could be useful to the entire team. This saves folks from desperately scrambling for this information when they need it.
Once you start populating your case database with issues and designations (as we cover in Part 2), the Evidence Dashboard will become even more helpful and useful for the entire team.

Nextpoint’s evidence dashboard
★ See Nextpoint’s Deposition Transcript Software Solution
Nextpoint’s comprehensive deposition transcript software is integrated with the rest of our ediscovery and case building tools, so you can keep all your evidence in one place. Click the button below to schedule a demo and see how Nextpoint can streamline your deposition and case prep process.


